Chocolate Dot Cake Recipe
That crunchy crack of a spoon breaking through a dome of tiny rainbow sprinkles is the sound that took over your feed, and now you can make it in your own kitchen.
This chocolate dot cake is the homemade take on the viral Dotcup: a single-serving cup layered with moist cocoa sponge, a thick smooth top of chocolate buttercream, and a dense shell of spherical rainbow nonpareils pressed right into the frosting.

Cold from the fridge, you tap your spoon through that crackly sprinkle crust into soft chocolate cake underneath. It is pure dessert ASMR.
Here is why this one fits the brand. The bakery cups that started the craze sell for around 8 to 11 dollars each. You can make two of these from scratch using nothing but everyday pantry staples, for a tiny fraction of that.
Cocoa powder, flour, sugar, an egg, butter, and a scoop of sprinkles. That is it. Cocoa powder is the budget hero here, since unsweetened cocoa gives you deep chocolate flavor and a dose of natural flavanols without the cost of fancy chocolate bars. Best of all, it is portioned into single cups, so you get a controlled, satisfying treat instead of a whole cake tempting you for a week.
Why You’ll Love This Recipe
- Way cheaper than the viral original. Two cups from pantry basics, instead of paying bakery prices per cup.
- That ASMR crunch. The nonpareil shell sets up crisp against the soft frosting, so every spoonful starts with a satisfying crack.
- Built-in portion control. Single-serving cups mean no giant cake and no waste.
- Truly beginner-friendly. One bowl for the batter, one bowl for the frosting, and the sprinkle crust is the easy part.
Fabian’s Budget & Health Tip: Skip expensive baking chocolate and build the whole flavor on unsweetened cocoa powder. One tub costs a fraction of a chocolate bar and lasts for months. Want to lighten it up? Swap half the oil in the sponge for plain yogurt. You cut the fat and the crumb turns even softer. One more money saver: a small jar of nonpareils coats many cups, so the priciest looking part is actually the cheapest.
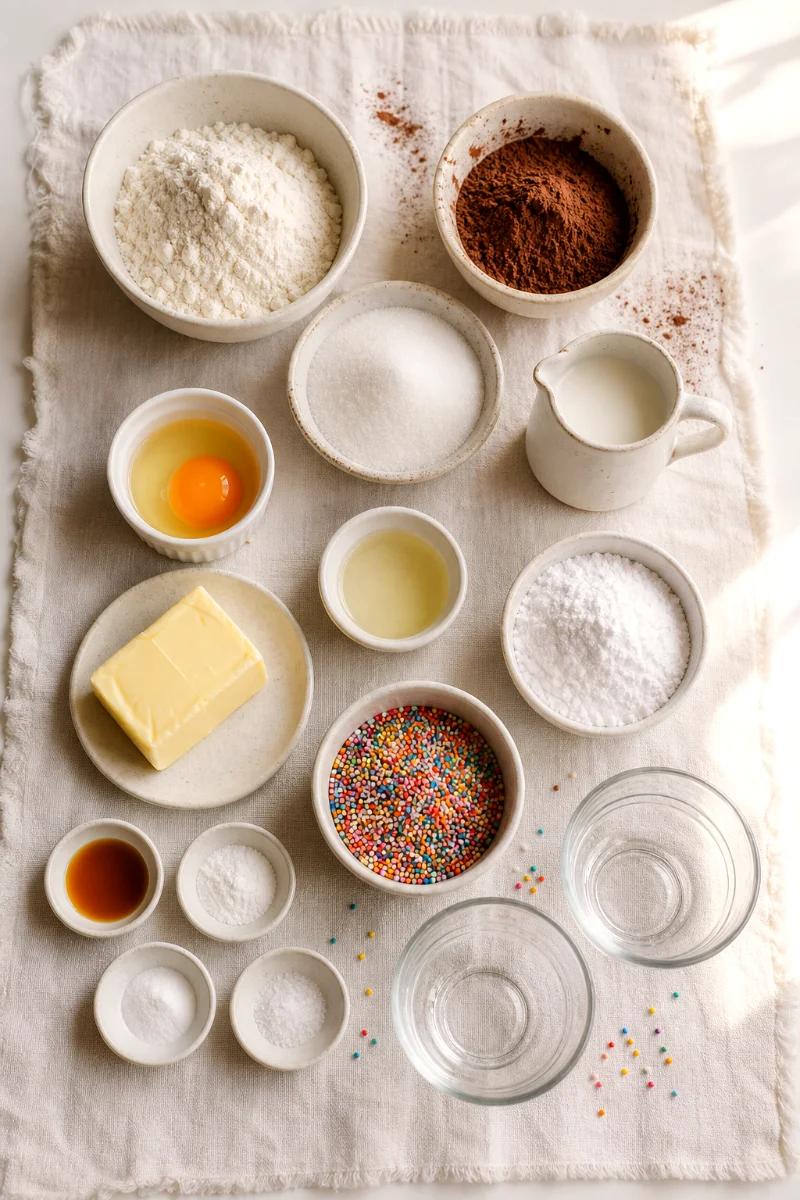
Ingredients (Serves 2)
For the Cocoa Sponge
- 1 large egg
- 1/2 cup (65 g) all-purpose flour
- 3 tbsp (18 g) unsweetened cocoa powder
- 1/3 cup (70 g) granulated sugar
- 1/4 cup (60 ml) milk
- 3 tbsp (45 ml) neutral oil
- 1/2 tsp baking powder
- 1/4 tsp baking soda
- 1 pinch salt
- 1/2 tsp vanilla extract
For the Chocolate Buttercream
- 6 tbsp (85 g) unsalted butter, softened
- 1 cup (120 g) powdered sugar
- 3 tbsp (18 g) unsweetened cocoa powder
- 2 tbsp (30 ml) milk
- 1/2 tsp vanilla extract
- 1 pinch salt
For the Dot Shell
- 1/2 cup (90 g) spherical rainbow nonpareils (the tiny round sprinkles)
You will also need: 2 small cups or jars, about 8 oz (240 ml) each.
Step-by-Step Instructions
🔥 Step 1: Prep the Pan and Oven
Heat your oven to 350°F (175°C). Line a small square pan, about 6 inch (15 cm), with parchment, leaving a little overhang so you can lift the cake out later. The pan should look clean and ready, with the paper pressed flat into the corners.
🥣 Step 2: Whisk the Dry Ingredients
In a bowl, whisk the flour, cocoa powder, sugar, baking powder, baking soda, and salt. Watch the streaky cocoa blend into one even, dusty, dark mix. Break up any little cocoa lumps with the whisk so the batter stays smooth.
🥚 Step 3: Mix the Wet Ingredients
In a second bowl, whisk the egg until it loosens and turns pale and frothy. Pour in the milk, oil, and vanilla. Whisk until glossy and smooth, with no slick of oil floating on top.
🍫 Step 4: Combine into a Batter
Pour the wet mix into the dry. Stir just until it comes together into a smooth, pourable, deep-brown batter that ribbons slowly off the spoon. Stop the moment the flour streaks vanish, so the crumb stays tender.
♨️ Step 5: Bake the Thin Sponge
Pour the batter into the pan and tilt it so it spreads into one even, thin layer. Bake for 15 to 18 minutes. It is done when the top springs back at a light touch and the kitchen smells warm and fudgy. A toothpick should come out clean. Because the layer is thin, start checking early.
🧊 Step 6: Cool, Then Cut Rounds
Lift the cake out by the parchment and let it cool completely on a rack. Once cool, use the rim of your cup or a round cutter to press out rounds that fit snugly inside. Cut as many as you need to layer both cups, usually two rounds per cup. The cake should feel springy, not warm.
🌀 Step 7: Whip the Chocolate Buttercream
Beat the soft butter until pale and creamy. Sift in the powdered sugar and cocoa, then beat again. It looks dry and crumbly at first. Add the milk and vanilla and beat for a full minute, until it turns silky, fluffy, and smooth enough to hold a soft peak on the spatula.
🥄 Step 8: Layer the Cups
Drop one cake round into the bottom of each cup. Spread a thin swipe of buttercream over it, then add a second round and press gently so it settles flat. The layers should sit level, just below the rim, leaving room for the thick top.
🎯 Step 9: Build the Smooth Top
Spoon a generous mound of buttercream over the top of each cup. Smooth it flat and even with the back of a spoon or a small spatula, right out to the edges of the cup. You want a clean, glossy, level surface, because this is the canvas for the dots.
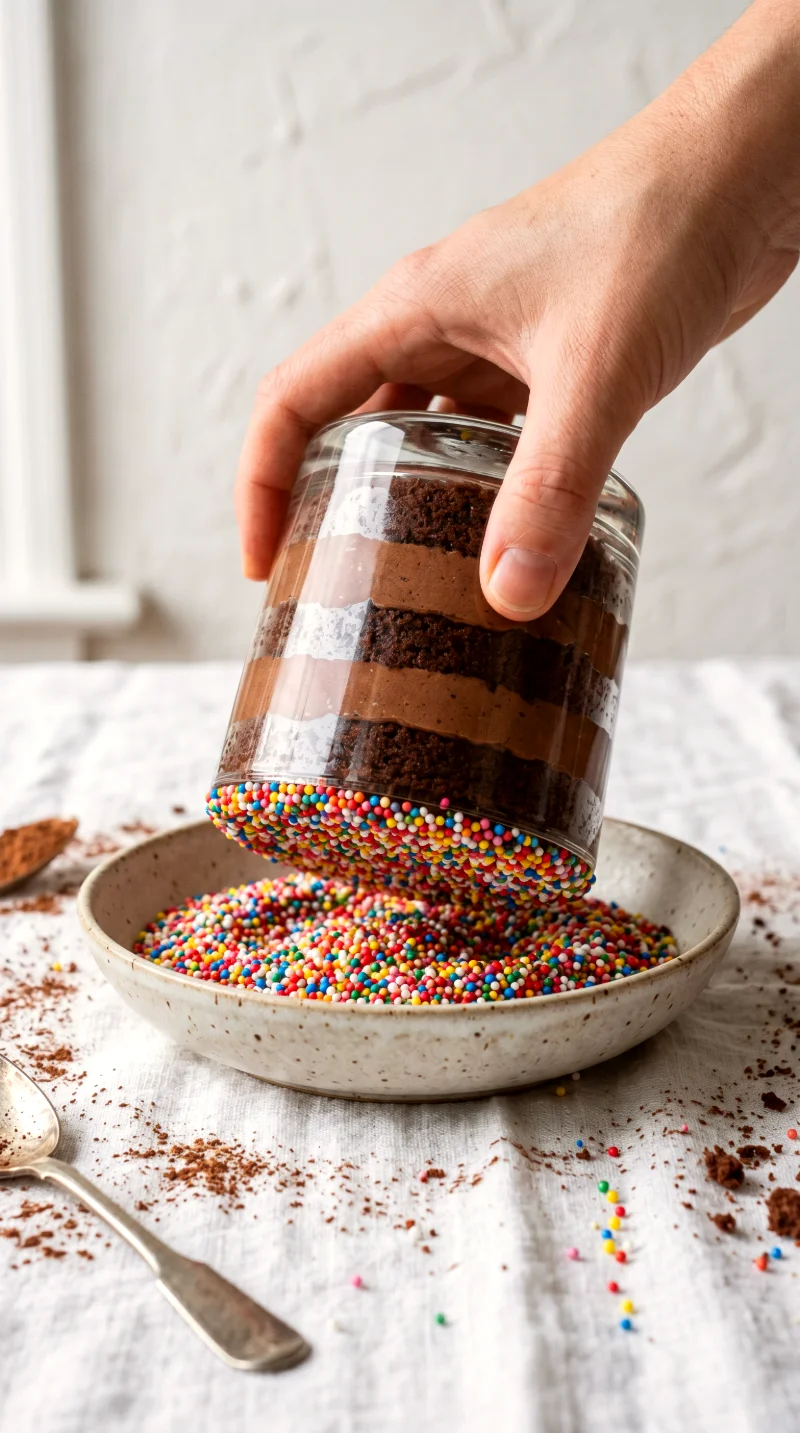
🌈 Step 10: Press the Sprinkle Shell
Pour the nonpareils into a shallow bowl. Hold a cup upside down and press the frosted top firmly straight down into the sprinkles, then twist slightly and lift. The top should come up completely buried in a dense, even coat of tiny round dots, with not a speck of frosting showing through. Repeat with the second cup.
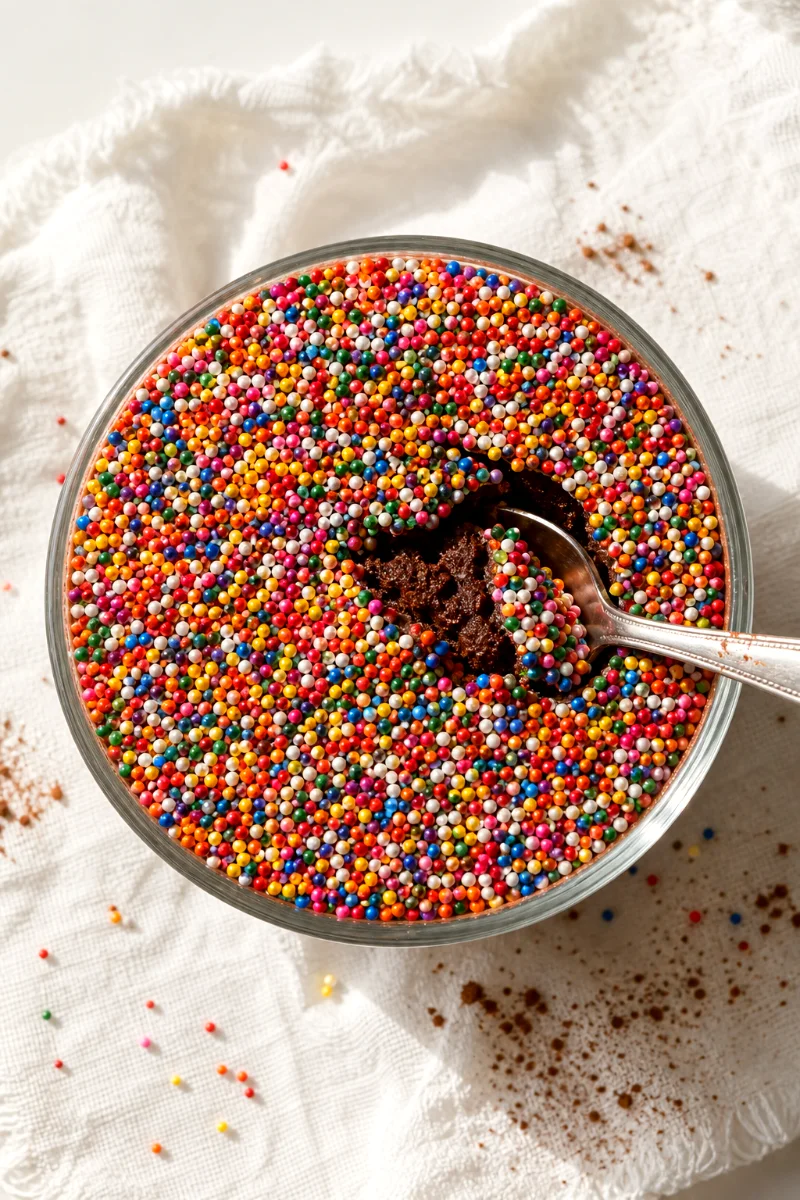
❄️ Step 11: Chill, Then Crack
Chill the cups for at least 30 minutes so the shell firms up against the frosting. Serve cold, or let them sit out 10 to 15 minutes to soften the cake slightly. Then tap your spoon down through the crust and listen for that signature crunchy crack before you dig into the soft chocolate layers below.
Expert Troubleshooting & FAQs
Why won’t my sprinkles stick in a full, even coat?
Your frosting top needs to be soft and freshly spread, not chilled. Cold buttercream goes firm and the nonpareils just bounce off. Smooth the top, then press it into the sprinkles right away while the surface is still tacky. Press firmly and twist so every gap fills in.
My buttercream is too thin to hold a smooth top. What do I do?
Beat in more powdered sugar, one tablespoon at a time, until it firms up and holds its shape. If your kitchen is warm, chill the bowl for 10 minutes, then beat again so the butter tightens back up. A firm, spreadable frosting is what gives you that clean domed surface.
Can I make these ahead?
Yes, with one trick. Assemble and frost the cups, then keep them in the fridge, but add the nonpareils only within a few hours of serving. Sprinkles left on overnight can bleed color into the frosting. Crust them fresh and they stay bright and crisp.
Estimated Nutritional Facts (Per Serving)
Based on 2 filled cups, using all the frosting and sprinkles.
- Calories: about 720 kcal
- Protein: about 7 g
- Carbs: about 96 g
- Fats: about 34 g
These are rough estimates and will shift with your exact brands, your cup size, and how much frosting and sprinkles you use.